Having correct focus is vital to achieving good results with any type of photography and just as much with webcam imaging. It is an important subject because it tends to be difficult to do. Poor seeing can make it difficult to know just when the image is in focus -- a swimming moon or a swirling star is not what we are hoping for, and yet these are what we might see even when the focus has been set optimally.
Furthermore, our job is made even more difficult by the fact that to adjust the focus you have to touch the telescope. At the high magnifications we are using this will cause small movements that cause the image to rush across the screen at best, or disappear altogether at worst (if your mount is poor).
Fortunately there are various solutions to these problems.
-
Rough Focus can be achieved by using a parfocal eyepiece, as mentioned in the previous page. For this either a specially made parfocalising ring can be used, or a metal hose clamp instead. The principle is to set the ring around the eyepiece so it is stopped against the focusser tube at precisely the right position so that the camera will also be in focus if it is inserted without changing the focusser position.
To create a Parfocal Eyepiece:
- Focus the camera on some object using one of the other methods on this page
- Place the parfocalising ring around a medium-power eyepiece without tightening the screw
- Move the eyepiece in and out of the focusser tube until the image seen in the eyepiece is focussed well but move the eyepiece only -- don't adjust the focusser!
- When the eyepiece position is "just right", hold it in position and tighten up the screw so the parfocalising ring is clamped in position
Next time you want to find focus, insert the parfocal eyepiece up to the stop, and adjust the focusser until you see a focussed image.
-
A Motorised Focusser. To avoid the telescope tube shaking and causing the image to wander around the screen when adjusting the focusser, the best method is to avoid touching the focusser at all. Adding a motor that will turn the focusser for you will avoid this problem altogether. Various solutions are available, from expensive commercial equipment, to simple battery-and-switch home made circuits. One particularly elegant solution is to use another motor as a generator and connecting it back-to-back with the motor on the focusser. Then turning the "control" motor by hand will generate just enough power to turn the focusser motor by the same amount. This provides a very easy-to-use and intuitive way of operating the focusser.
-
Diffraction spikes, or, the "Chopsticks" method. This is a method of focussing on a bright star and relies on the fact that when such a star is in perfect focus sharp spikes will appear radially from it due to diffraction of light around any obstructions in the light path.
Several types of obstructions can be used to provide the spikes -- if you use a Newtonian telescope with a secondary "spider" then this can be used as a built-in diffraction generator, although better spikes might be obtained by adding a thinner obstruction. This can be done by taping chinese chopsticks or even taut wire across the telescope aperture.
Find a bright star and centre it in the webcam preview. Adjust the settings to give the longest standard exposure time and a high gain. Adjust the focus so that spikes are seen coming from the centre of the star. If you see no spikes when the focusser is adjusted so the star appears smallest, then the star is not bright enough. With an unmodified camera you really need a first-magnitude star. If your camera is capable of long exposures, then exposures of several seconds will produce spikes on dimmer stars, making the job easier.
Adjust the focus in small amounts until the sharpest possible spikes are seen. The camera is now in focus!
-
The Hartmann Mask. This is a cover for the end of the telescope with two or more holes cut in it, symmetrically around the centre. When viewing an out-of-focus image, duplicate images will be seen. As the focus is adjusted closer and closer to true, the images converge until at the point of focus only a single image is seen.
A useful technique is to make a mask with two circular holes and one triangular one. Then a triangular image will be seen in addition to the round ones. The nice part is that the triangle will point in opposite directions depending on which way the focusser needs to be moved.
-
Measuring FWHM with software. Another method is based on a measurement called Full Width Half Maximum, which represents the size of the star's image (actually the width at the point of half-maximum intensity hence the name - see this page for a good explanation), in arcseconds. Since an out-of-focus star is spread out as compared with a focussed one, by minimizing the FWHM of an imaged star we effectively minimize the focus error. Unfortunately (since I use it for imaging), K3CCDTools does not (yet) support this feature, however various other software tools are available that do, such as Astrosnap and QCFocus. These also capture images so can be used instead, or you can swap programs once focus has been achieved.
-
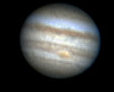
Planetary Satellites. A further technique when imaging planets is to focus on a moon (satellite) of the planet. For example when imaging Jupiter, several of the four Galilean satellites are normally easily seen. Due to the small and faint nature of these objects you can be sure that if they are in focus, so is the planet itself.
Now you can move on to Capturing the Images
|