|
Techniques: Registax Tutorial for Planetary processing | |
| HOME Best Lunar Planets Deepsky Misc Equipment Techniques Links |
| Tutorial continued...Click HERE to return to the beginning. |
2. Alignment
|
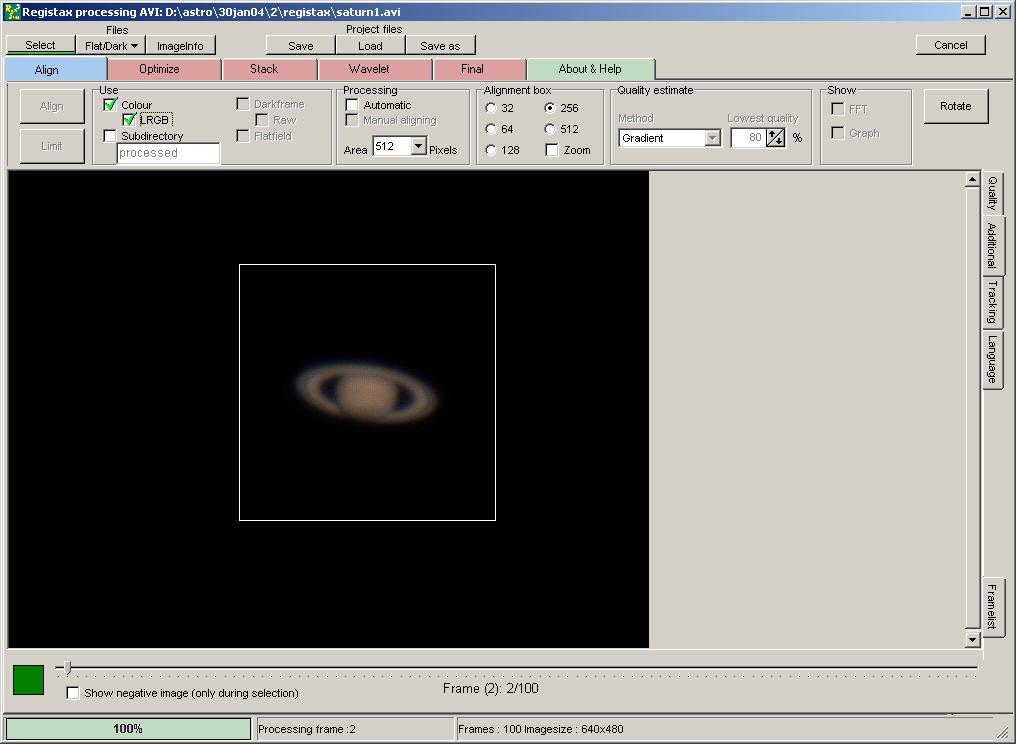
The file will be loaded in and displayed in the main area of the screen. Now Registax will align the frames. To do this it must match a feature that is present on all frames. First choose a frame that is particularly good -- the Frame slider along the bottom can be used to move between frames (tip: click it then use the arrow keys to move through the list one-by-one).
Once you have found a good frame you need to click on the centre of the feature on which you want to align. For Saturn the whole planet is suitable. You must choose an alignment box size that covers the whole feature, plus any movement it might make between frames (not the total movement across all frames, just the small movement betwen frames. Choose from 32, 64, 128, 256, or 512 pixels at the top. Here I've chosen 256. You can also select "Zoom" to show a small additional detail window to help click on features on highly detailed images. |
|
Click on the centre of the feature in the image to select it. The picture shows that I have chosen frame 2 out of 100 (this is a short AVI for demo purposes!).
At this stage you must also select various options - Click Use Colour if your image is in colour. LRGB can improve the quality. Also choose the method of quality estimate. For planetary I recommend choosing Gradient, which is new to Registax 3 and was developed in conjunction with some expert planetary imagers, which hopefully means good results will be achieved. If the box is checked, the FFT window will also be displayed, which shows the Fast Fourier Transform graph used for alignment. Leave the setting at the default, but increase it and try again if you later find you get misalignment errors. |
|
|
|
You will see that the Align button has a green line now, so click it to move to the next step. You will see the image move around as it replays through the frames of the AVI, and works out the adjustments necessary to align on your chosen feature. A graph will be displayed showing a blue line indicating the alignment adjustments for each frame, and a red line showing general quality. The frames have been sequenced in order of quality, and you can now limit the number of frames used in the AVI (we only want the best) by sliding the bottom slider along (eg. half way, to use half the frames). The picture shows I have selected 50 of 100 frames, and that is reflected both in the caption under the slider, and in a green bar on the graph. The image display shows the 50th frame. |
| Now click Limit, which you will have noticed has a green line underneath, to indicate the processing should be limited to the chosen number of frames. The main window will move to the next tab, Optimize, in which the alignment is optimized iteratively to get the best possible alignment. | |
< PREVIOUS |
NEXT > |
|
|
|
 |
|
| All text and images copyright and may not be used without permission |
|